Crafty and Cool DIY Paper Diamonds
If you are looking for something 'crafty' involves the kids and the simplicity of paper in the lead up to Christmas...then this post is for you!
This week we are happy to be partnering with the very clever and crafty; Jakarta-based, paper enthusiast and teacher, Raya Jenie from 'Fold Me Now'. We discovered Raya's colourful work via Instagram this year and have been enjoying her paper sculptures ever since.
Raya's passion for origami began three years ago when she was on maternity leave and she finds folding and cutting paper to be therapeutic. This year she began teaching folding classes, and as it turned out, Raya gets just as much satisfaction from passing on her knowledge and tips and tricks as she does making.
Today Raya shares her DIY Three Dimensional Paper Diamond.
Raya's Paper Diamond:
Is the perfect Christmas tree decoration
Can be strung together to make a mobile or garland for any occasion
Is the modern minimalist stocking filler gift
A super-cool alternative to ribbon and a bow
Would look stunning grouped together and popped around the house for a bit of festive cheer.....And the list goes on!
Read on as Raya provides:
A list of tools and equipment for this project, Suggestions on where to source materials in Jakarta and, Instructions on how to make your own paper diamond.
A very warm welcome to ajb Raya! Now let the paper folding begin!
*Kenalkan: Raya Jenie

Processed with VSCOcam wit’
Tools and materials - You will need:
2 sheets of square paper, the same size as one another. I used 3 x 3 inches, but any size will do as well
string
a needle
scissors – to cut the strings

Where to find the materials in Jakarta:
DAISO (Japanese $2 shop) has a great collection of origami paper. These are my favorites because they are very precisely cut, have the ideal thickness for these models, and have an amazing array of colours & patterns.
Alternatively you can use any kind of paper you can find, as long as it is in a square shape. Other than origami paper, I also like to use Spectra paper which are just coloured copy paper in A4 size, then I cut them into squares myself. You can get these in any bookstores in their stationery section such as Paperclip or Gramedia.
Gift wrap paper is also a great choice. You can find nice ones in Aksara bookstore or Alun-Alun (lots of batik patterns) or any gift wrapping counter.
Strings, needle & scissors can easily be found in any craft stores, or stationery stores like Paperclip.
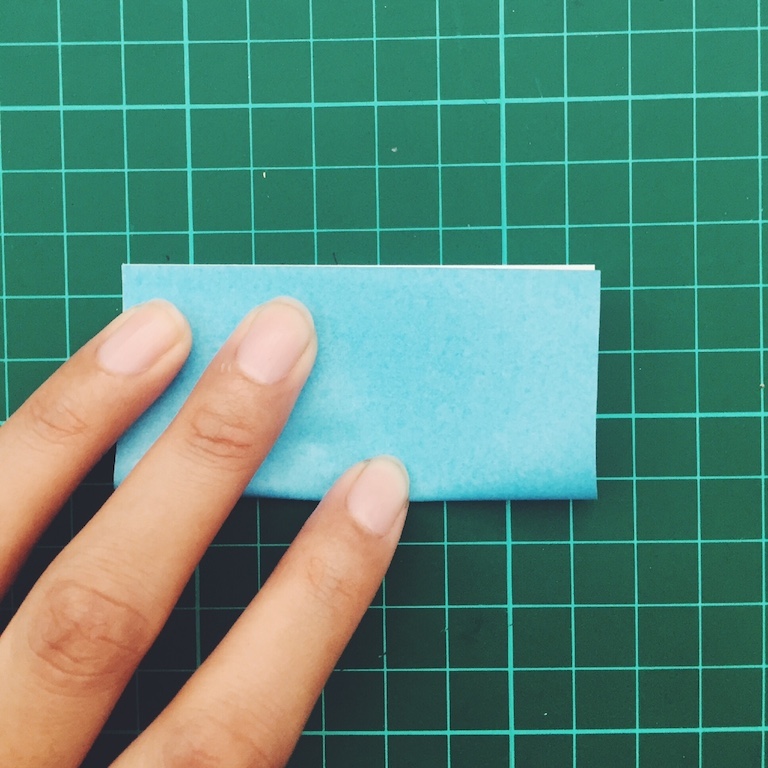
1. Take one paper to make a module. Starting with the white side up, fold the paper into two. Open, do the same to the other side. Open.
2. Turn over (color side up), fold in half diagonally. Open, and do the same to the other side. Open & turn over (white side up)

3. Collapse the model into a smaller square, following the creases we just made earlier. Don’t force it, just let the pre-creased line do that for you.

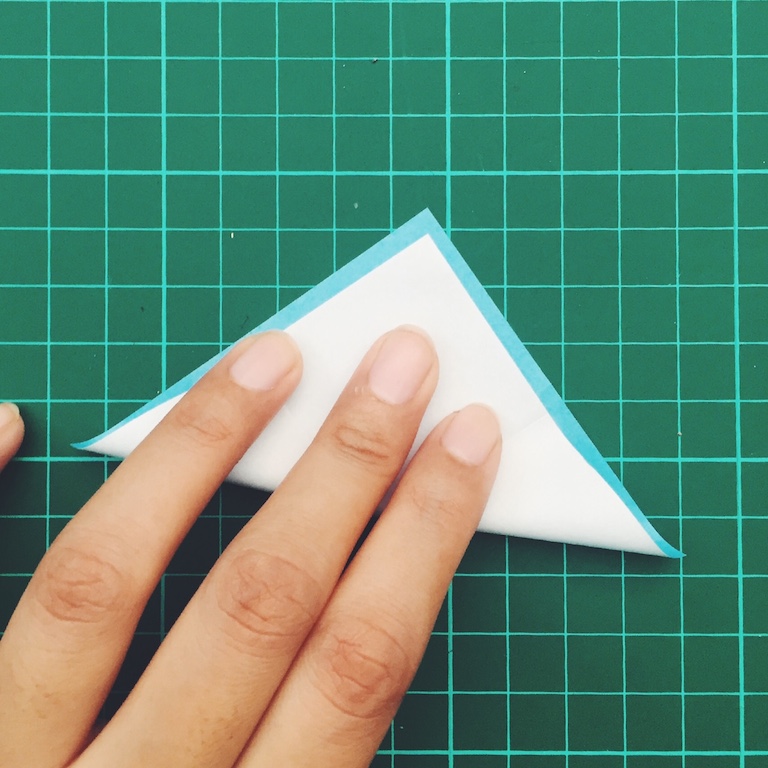
4. You now have four flaps around the model.

5. Take one flap, squash it down while making sure that the centre is aligned.

6. Do the same to all the other flaps until you have a small shape of a kite. Now you have one module ready.

7. Do the same steps to the other paper. Use a different color to make it more interesting!

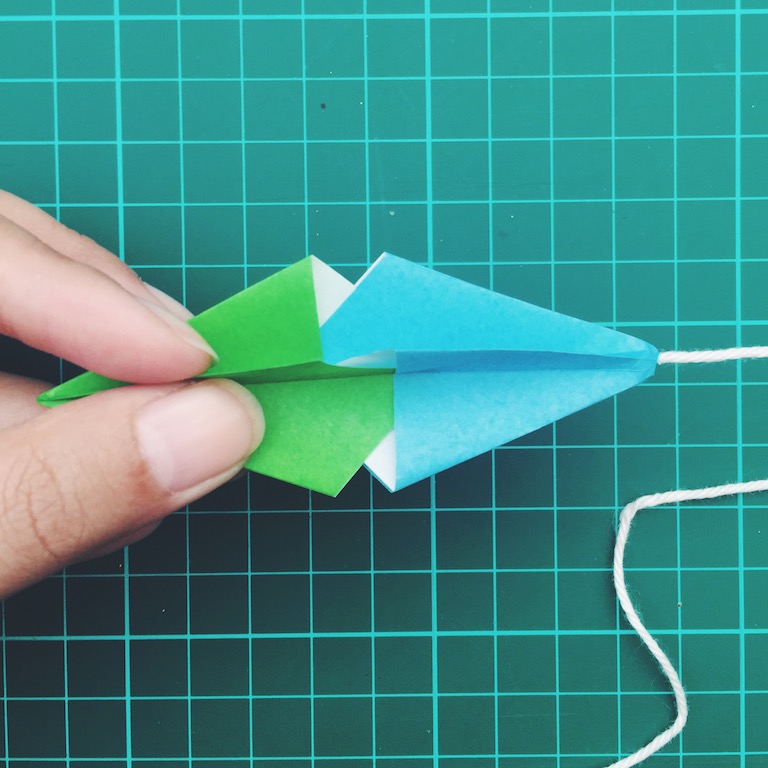
8. Draw a string to the needle. Make a big knot at the end of the string (I usually do two knots to keep it from slipping)

9. Open one of the modules (don’t worry, it’s easy to refold them back) and stick the needle through at the centre, then pull the string up. Fold the model back to its shape.

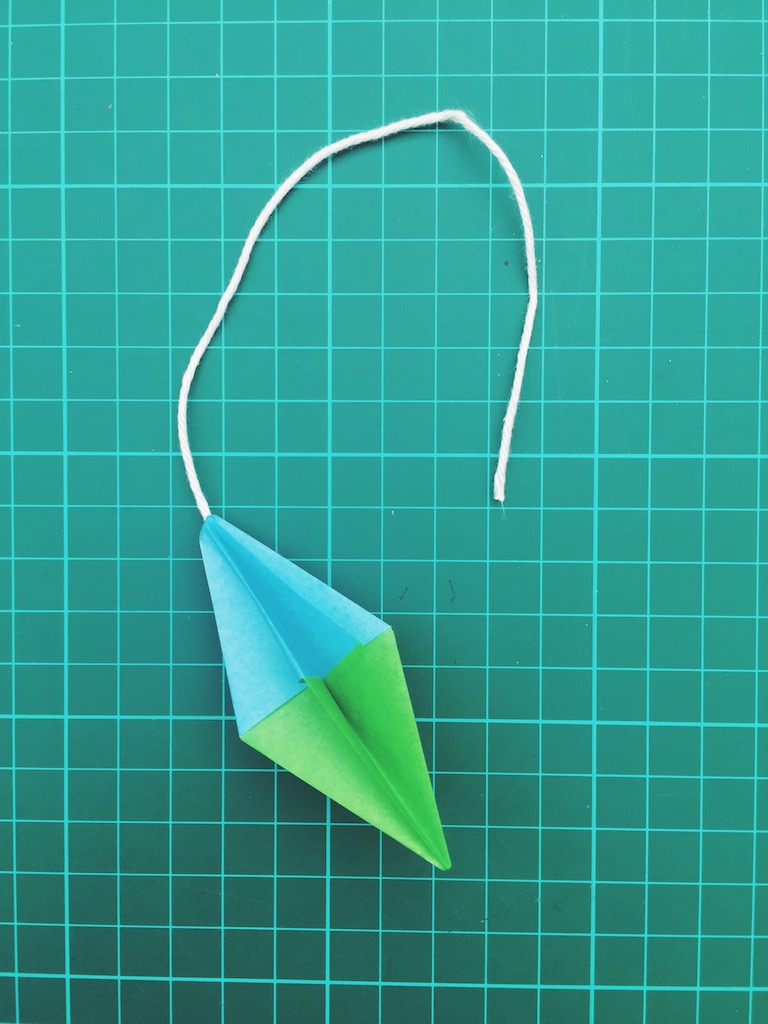
10. Now comes the trickiest part. Take the stringed module on your right hand, and the other one on your left. Start working on the flap by slowly inserting the tip so that the pointy part of the flap is inside of the non-pointy part. In my picture here, the ‘pointy’ is the green one and the ‘non-pointy’ is the blue one.
TIPS: You can carefully lift the non-pointy part with your finger to slide the pointy part in. Don’t fret if you can’t get it right the first time. I had three attempts before getting the hang of it ☺
1. Do that to all eight flaps. Make sure that each of the flaps are on the correct place otherwise you will not have a perfectly symmetrical diamond.
2. Once you insert all the pointy & non-pointy parts into each other, slide the module in to secure & tighten it.
3. Now you have your diamond ready to hang to your christmas tree.
4. Make more with different colours!
We look forward to hearing all about your crafting efforts, and would love to receive pictures of your 3D creations. Please send them to us at hello@ajourneybespoke.com
Want to see more DIY on ajb? We would love to know your thoughts.
In the meantime, do follow Raya's colourful Instagram feed for more geometric creations, workshops and colourful paper craft in Jakarta.
Instagram: Fold Me Now
Email: rayajenie@gmail.com
*Kenalkan: Let me introduce
Words: Liz McClean and Raya Jenie Photographs: Raya Jenie and Fold Me Now
You might also like:
The ajb Ultimate Guide to preparing your home for a Jakarta Christmas
Pottery for Kids at Indoestri Makerspace